Friday, August 31, 2012

Berry Italian Sodas


I absolutely love Italian sodas, with cream of course.  You can make your own syrup or buy it to save time.  I couldn't find any syrup at our local store, so I made a berry syrup from frozen (and thawed)mixed berries.
 
Here is what you will need:
 
Homemade or Store Bought Syrup
Club Soda
Cream (I used half & half)
Ice and Straw (optional)
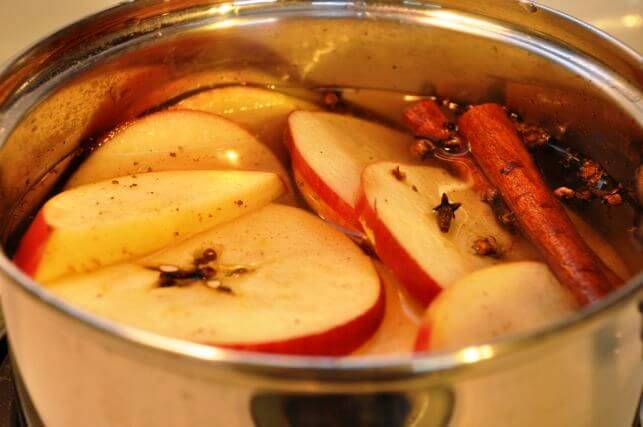
 
Syrup Ingredients:
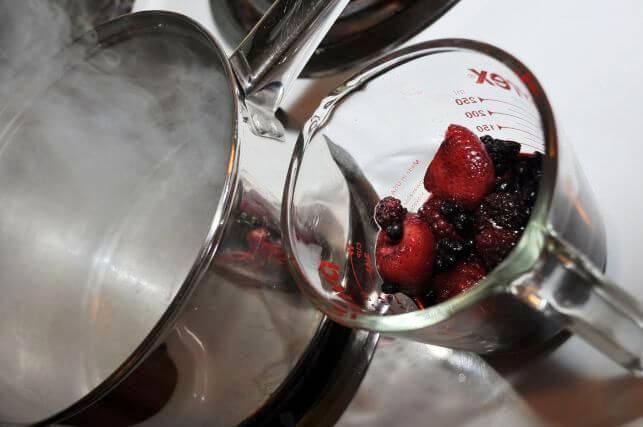
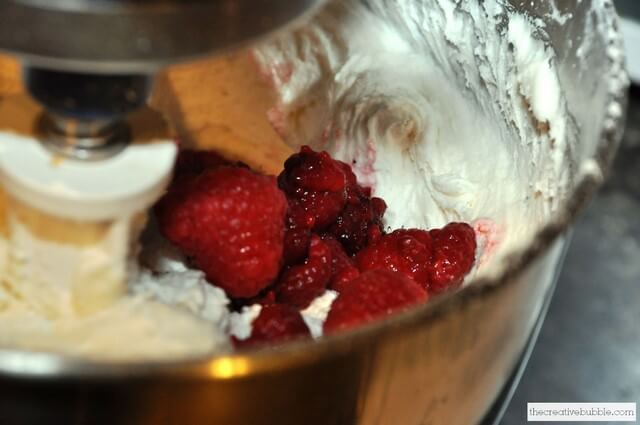
1 C Berries of Choice
1 C Water
1 C Sugar
 
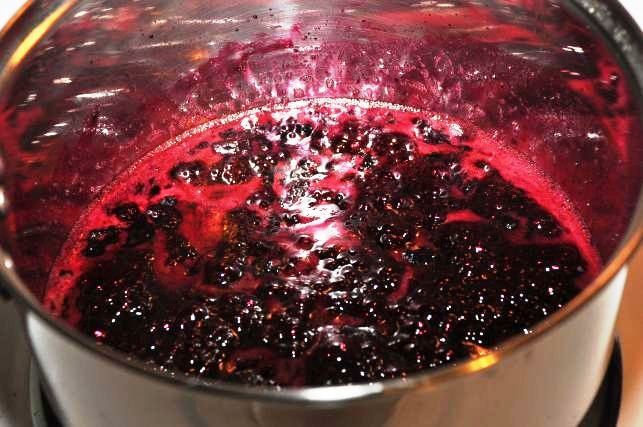
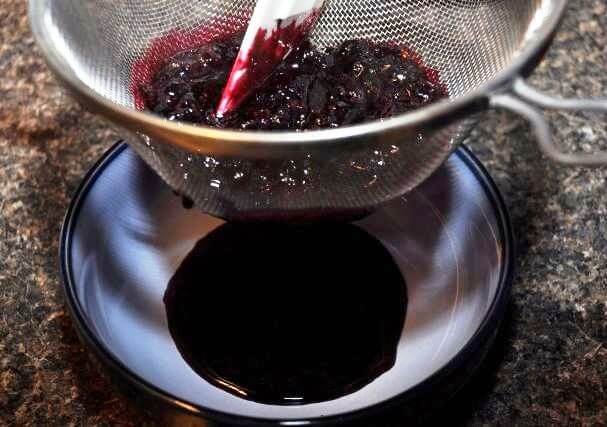
Directions for making homemade berry syrup:
Boil the sugar and water until the sugar is dissolved.  Add in the berries, and boil for 10 minutes.  Simmer for 5-10 more minutes.  Try not to let the syrup become too thick.  Strain the berries out, letting the syrup drip into a bowl.  Allow the syrup to cool before making soda.  The extra syrup will stay fresh for a few days in an airtight container in the fridge.


Directions for making Italian soda:
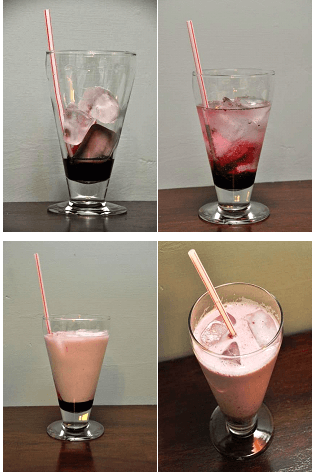
Fill a pretty glass with ice :)
Pour as much syrup in as you like.  I usually do about 2 tbsp per 16 oz.
Pour soda in leaving space for optional cream.
Top with a little or a lot of cream.
Add a straw, stir, and enjoy.
 
 
Stay tuned for a chai Italian soda with a homemade chai syrup!
 
 
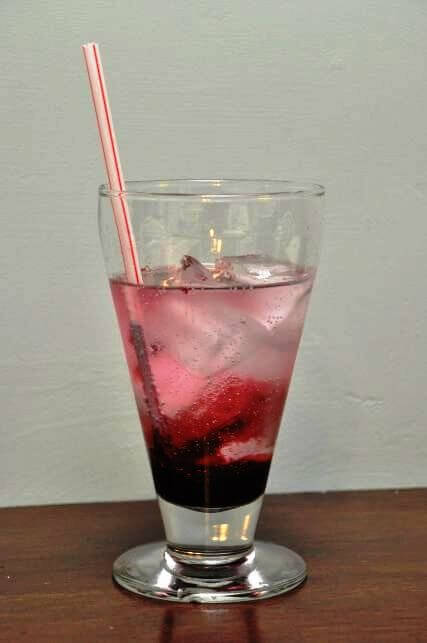
before I added the cream 


Wednesday, August 29, 2012

Fall Potpourri

This is a really good and natural home fragrance (there are lots of bad things in most air fresheners...so I've heard).  I like to have it on the stove when company comes over. 


There are so many memories that were created with this homemade potpourri filling the air.  My mom made it when I was growing up, and now every time Fall comes around, it gives me an excuse to carry on the tradition. 

I absolutely love walking into my house and breathing in the apple, nutmeg, cloves, and cinnamon.  In my mind, nothing captures Autumn more than this scent. 

You will need:
a small saucepan
3 cups of water
1 apple
2-4 cinnamon sticks
1/2 tsp of nutmeg
10-20 whole cloves
1 orange (optional)
extra pinch of cinnamon (optional)


Directions:
Cut apple (and orange if you choose to use it-even better with it!).
Toss all ingredients into water in pan.
Make sure that the water covers all of the ingredients.  If not, add more water.
Let the potpourri sit on low for up to three days.  I never leave it on at night or if I go somewhere.

You will probably be tricked into believing that something delicious is baking in the oven.  I've never tried it, but I just thought that adding a little vanilla to the potpourri might make it smell even better.
 

Tuesday, August 28, 2012

A Little Curtain

The notebook paper started to wear on me a bit.  I couldn't find a curtain to buy to fit this small front door window, so I had to break down and make one. 

 
I got a sewing machine for Christmas from my husband's family, but have only used it once.  Sewing has always scared me.  I thought a tiny curtain project would be a good start.


The scariest part was getting the machine and thread ready to go (instruction manuals=ick).  I realized that sewing itself is pretty fun, and would be something I can envision loving with some practice.


...and finally, we have a curtain made out of fabric instead of paper!
 
Mission accomplished.

Wednesday, August 22, 2012

Cookie Dough Truffles

Should I be embarrassed about this?  Hmm...I'm going to go ahead and say, "no way".  This isn't the healthiest recipe I'll ever post.  I blame it on my pregnancy. 

I had some cookie dough ice cream in Florida last week, and couldn't get it out of my mind.  I was cookie dough crazy!  I ran into a picture of cookie dough truffles online, and had to make some of my own. 

I used a recipe I found on bakerella.com, then modified it a little. 

Makes appr. 15 cookie dough balls

Ingredients:

1/4 cup softened butter
1/8 cup white sugar
1/4 cup packed light brown sugar
1 tablespoons milk
1/4 teaspoon vanilla
1/2 cup all purpose flour
1/4 teaspoon salt
1/4 cup mini chocolate chips
1 cup dark chocolate chips (for coating)


Directions:

Cream butter and sugars with mixer until fluffy.
Add milk and vanilla while continuing to mix on low.
Stir salt into flour, then gradually mix into dough.
Add chocolate chips, mixing just until combined.


Place dough in refrigerator until firm enough to roll into balls.
You can use a melon ball scoop to ensure each ball is the same size.
Place on parchment paper, then freeze balls for about thirty minutes.
Heat chocolate in a double boiler.
Dip balls into chocolate, then place back on parchment paper.
Decorate the tops with sprinkles or sugar crystals (I used gold sugar crystals) before the chocolate hardens.

They last for up to a week in the refrigerator in an airtight container.

Now I just need someone to help me eat these!  


You can bake this dough on 350 until lightly browned.  It turns out like a chocolate chip shortbread, because there is no baking soda or eggs. 

Saturday, August 18, 2012

Homemade Cream of Chicken Soup

There are tons of delicious recipes out there that use cream of chicken soup, especially crock pot recipes.  I used to turn my nose up at these recipes, because I try to avoid cooking with c of c soup.  It has soy in many different forms and other scary additives, too.  If you know me, you know I don't like to eat soy.  It's in SO many things you'd never imagine it would be in.  It's usually in the form of a hydrogenated fat and is one of the highest marketed genetically modified organisms.  I sometimes make exceptions for the emulsifier, soy lecithin, because it's in most chocolate.  I can't live without chocolate!

Anyway...enough of my bratty preaching about soy.

Here is how you can make your own cream of chicken soup!


Ingredients:

3 T Butter
1.5 T Flour
3/4 C Milk
3/4 C Chicken Broth

This recipe makes the equivalent of about one can of cream of chicken soup.


Directions:

Melt the butter on medium heat. 


When it's completely melted, stir in the flour until well combined.


Turn to medium high.  Stir in the milk and chicken broth.


Bring to a boil, stirring continuously until thick.


Remove from heat.  Add salt and pepper if you like.


Yum, yum, yum...this stuff is good!  It's really easy and quick to make if you're in a hurry.

I used it in a chicken pot pie tonight, and it turned out great.

I think I want to try making cream of mushroom soup next.

Friday, August 17, 2012

Vacation Time

We went to Seagrove Beach, FL this past week.  It was really nice to get a break from the mundane lifestyle we have sunk into.  After sitting on the couch for the last three months (1st trimester sleepiness), I was ready to do anything but that!  I'm finally starting to wake up.

I had been counting down the days until Bug would get to see the ocean for the first time. 

He loved the water, but wasn't sure about the sand. 
He wanted to eat it, but didn't want to touch it.


 Hey, look, there's sand on my hand.


Wait, I don't think I want sand on my hand!


handsome guys

It was interesting to be at the beach during "Shark Week".  We watched it every night.  Thank goodness we didn't see the shark attack segment that showed them attacking in just three feet of water until the night before we left!  We also got to be there during a meteor shower.  It was magical to watch shooting stars while listening to the ocean.

Next Summer, we will have two babies to bring to the beach.  That should be a lot of fun in a very busy way! 

Tuesday, August 7, 2012

Playing House

I never really envisioned what my wedding day would be like.  I never imagined what it would be like to actually be married or what it would be like to be a mom.  I'm a planner, BUT...I didn't want to picture a life that might be different from my expectations, and I wanted it to unassumingly unveil itself...to be a beautiful surprise.

Today, Michael took Levi to the park and grocery store, giving me the first alone time I've had at our new house to date. 

It was...nice. 

It gave me some time to reflect on where we are as a family, where I am with God, to clean & organize, and to listen to any music I wanted as loud as I wanted.  Michael doesn't share my love for Dar Williams. 

While I had the house to myself, I realized how much I have "grown up" as a woman. 

Wasn't I just a little girl yesterday?  ...playing with Barbies and asking my own mom to get down on the floor and play with me?

Sometimes, it feels like I'm playing house. I suppose I'm still a little girl in many ways, and cannot fully grasp the fact that I am now the one who is being looked up to as I cook dinners and pour juice into sippy cups. I'm the one who seems so tall, who sings silly songs to the backseat audience, who scoops him up when he falls, who ties his double knot escaping shoe laces...  Now, I'm the mom. 

There's a tiny, little guy tugging at my pants everywhere I go, and... I. Love. It. 

It's excitingly shocking when I look down at his sweet face and see that he looks like me...that I am his mom, and that he has a delightful personality of his own.  It feels wonderfully surreal. 

Isn't God amazing?  Isn't it incredible that we are given the ability to create these little people? 

I never imagined how rewarding it would be to be married, to have a child, and to have another child on the way. 


Sunday, August 5, 2012

Chocolate Fudge Icing

This is a buttery, chocolaty, not overly sweet, delicious, fudge icing! 

It took me a while to find the perfect chocolate icing.  My search ended when I finally conquered this recipe.  Now it's definitely my go-to-chocolate-icing. 


Ingredients:

1 C softened butter
1/3 C unsweetened cocoa powder
4 C powdered sugar
2-6 T milk (depending on desired consistency)
1/2 C hot fudge topping
1/2 C melted (and slightly cooled) chocolate

Directions:

Cream the butter by itself for about two minutes.
Sift the cocoa and powdered sugar together.
Slowly add the sugar and cocoa to the butter, alternating with the milk.
Add melted chocolate and fudge topping until smooth and creamy.

The final product is a creamy, semi-thick icing.  You can make it thinner by adding more milk and/or less powdered sugar.  It will get a fudge like consistency as it sets on the cake, so if you plan to decorate, try to do it as soon as you ice it. 

This is a chocolate cake with chocolate fudge filling and icing.  It has Hershey's cookies & cream and chocolate disks around the border.  Super chocolaty! 

The Good Year tires are made from fondant.  The cupcakes are a chocolate chip cake recipe that I just love.  I will post that recipe soon!
If you're looking for a delicious buttercream icing, try this one: Favorite Simple Buttercream

Saturday, August 4, 2012

Wild Orange Almond Bath Fizzies

Last Christmas, I made bath gift baskets for friends and family.  I had never made bath fizzies before, so I bought a kit.  It had everything I needed to make the fizzies.  I already had some essential oils (I recommend using doTERRA's certified, pure therapeutic grade oils.), so I used some of my own, too.  I went ahead and posted the ingredients and instructions below in case you want to try it without the kit.


Wild Orange Almond Bath Fizzies

Ingredients:

½ Cup Citric Acid
1 Cup Baking Soda
½ Cup Cornstarch
10-15 Drops Wild Orange Essential Oil
½ tsp. Almond Oil
Powdered food color (Optional)
Spray bottle filled with cold water
Molds (some came with the kit or you can use mini muffin pans or molds sold at craft stores)

Directions:

-Combine ½ C citric acid, 1 C of baking soda, and ½ C cornstarch. If not mixed well, the fizzies will be grainy. Pass the citric acid through a sifter if there are many lumps.
-Add food coloring. Only add a small amount as it is very concentrated. The color will show up after the water is added.
-Add 10-15 drops of orange essential oil and ½ tsp of almond oil. Mix quickly and mix well.
-While stirring the mixture with one hand, hold the spray bottle in the other and lightly spray with water just until the mixture can be packed together. Do not over spray. I over sprayed the first time, and ended up with goopy fizz balls that never set up right.
-As soon as mixture can be packed together, you can start filling the molds one at a time.
-Allow molds to set for 30-90 minutes. Invert onto a cookie sheet and gently tap out the fizzies.
-Allow to air dry for at least 4 hours.
-I stored mine in plastic bags, and labeled them.

How to order essential oils:
If you are looking for essential oils, I recommend using doTERRA's certified, pure therapeutic grade oils.  You can find them at  my doTERRA store .  If you'd like to receive wholesale prices, 25% off retail, please comment below or email me, and I can help you sign up.


For gift ideas, take a look at the other items that went into these Gift Baskets :

Peppermint Bath Fizzies
Tired Muscle Salt Soak
Lavender Bath Salts
Citrus Brown Sugar Scrub
Shea Butter Chai Tea Exfoliant Bar
Refreshing Shea Butter Soap

Ladybird Ln

Friday, August 3, 2012

Painting on Old Windows

Day after day, I drove past a lonely, side-of-the-road store that sells old windows.  I wondered what I could do with one after seeing so many different ideas on Pinterest

While we were in the midst of looking at about a thousand houses before we chose our home, I came across a cute house with an acrylic painted, floral designed, repurposed window.  It inspired me to finally pick out one for myself...or two...or three. 

a couple of my before windows


First, I cleaned the wood frames to prep them for painting.  I used "Krud Kutter-Gloss Off" from Sherwin Williams.  This amazing product can be used to prep for several different painting projects.  I like it, because it doesn't have harmful vapors, and is supposedly what they use in Elementary schools to repaint things.  You don't even have to sand some things when you use Gloss Off.


My windows were a little moldy looking in some areas, so I wanted to repaint the frames, but give them an antiqued look.  I went with crackle paint. 

All you have to do to use the crackle medium is to paint a base color, slather on a heavy coat of crackle medium (if you want it to really "crackle"), then paint a final contrasting paint color (so that the base color will show through the cracks).  When you apply the crackle medium, you have to work fast, because it dries very quickly.  If you go over the already drying crackle coat, it will peel off and won't crack.

These are the colors I chose for one of the windows.

the green base color


after the white top coat

Something really great about painting on glass with acrylic paint is that you can use a razor blade to easily scrape off any mistakes.  I did a sloppy paint job, because I knew it would be harder to be careful painting, than it would to scrape off the mistakes later.


Next, you can just go crazy painting whatever design you like.  Don't forget about the razor blade!  It's like an eraser and detail tool.  I used it to form little details in these dogwood flower petals.

I painted this window for my mother-in-law.


This one was for my mom.


It's so fun to paint on glass!  I'm currently working on a window for myself.  I'll post it when it's ready. 

If you try this project, email me your final product!!  I'd love to see what you come up with.

Linked up with:
The Frugal Girls 

Thursday, August 2, 2012

Grandma's Potato Soup

It's not a very Summery recipe, but...my husband came down with what seems like a cold yesterday, and he wasn't in the mood to eat anything today except POTATO SOUP.  We couldn't find a good recipe for it, so I decided I needed to call the best potato soup maker in the world...my grandma.  She was sweet enough to give me the entire recipe over the phone.  I'm so glad she did, because it was incredible as always!  Thanks Granny! 


Ingredients:

1 LG onion
3/4 C celery
1/4 C butter
5 C peeled, chopped potatoes
3 C water
3 C milk (divided)
4 tsp chicken bouillon powder
1/2 tsp salt
1/2 tsp pepper
1/4 C flour
4 C shredded cheddar
1/2 C cooked and crumbled bacon

Directions:

-Saute onion and celery in butter.
-Add potato and water.  Boil, then bring to a simmer for 15 min.
-Stir in 2 C milk, bouillon, salt, and pepper.
-Combine flour with the rest of the milk until smooth.
-Stir into soup, then bring to a boil for two min. until thick.
-Reduce heat, then add cheese and bacon until melted.


We were out of celery and bacon :(  but it was so good even without it.
We also used chicken broth in place of the water and bouillon. 

I LOVE this soup!