Tuesday, November 27, 2012

Wednesday Facebook Link Party

Welcome to Like Me on Facebook
 

This is a link up designed for bloggers who want to increase their facebook likes and share their facebook pages with others. PLEASE DON'T LINK UP YOUR BLOG.

Come back for Mom's Monday Mingle to link up your blog!


Please TWEET about the hop!


PLEASE LIKE FROM YOUR PERSONAL FACEBOOK PAGE ONLY!
**Facebook doesn't recognize likes from blog fan pages.
Please use your personal account to like.
***Please comment on facebook pages so we can make sure to RETURN follows.
Thank you!
Rules:
1. Please follow ALL of the hosts on facebook and twitter. They are 1-6 on the list.
2. Like as many facebook pages as you can. Visit pages and say hi! Leave your facebook page url so they can return the follow.

3. Please grab the button and place it on your sidebar or the end of a post. Together we can help each other grow!
Would you like to be the next Co-Host?
Scheduling NOW
for December 5th
 
Check Out This Months Sponsor:

LINK UP YOUR TWITTER PAGE HERE:

Sunday, November 25, 2012

Gingerbread House Competition


Every Thanksgiving night, my family has a gingerbread house competition for whichever family members want to join in. 


This year it was my husband & I, brother-in-law & sister, brother & his girlfriend, and her mom. We built three houses among all seven of us.


I don't remember a time that "the judges" actually chose a winner. We always hope they'll declare a winner, but we all get similar sympathy awards: most creative, most unique, most you name it.

We still fight to the death!

My sister and brother-in-law are straight up cheaters. Every year they go buy the best materials to make the most elaborate house, while we all use the gingerbread candy kit and old candy in my parents' pantry.

I'm just kidding. They don't really cheat. They are just professional gingerbread house makers. One year, they used real battery powered Christmas lights on a tree in their gingerbread yard.  Check out their entry way this year.  Nice job, losers!  ;)


My brother usually breaks gingerbread men in half, and frosts them in the ground OR he once made a gingerbread man shooting a cannon with tootsie roll cannon balls.  His house is always a mess.  Thank goodness he had his girlfriend and her mom along to keep things under control this year.  Here is their creation this year.


Michael and I are slow pokes.  We are always working on our house way too late.  Here is ours this year.  No, that's not a caprese salad in the front yard.  It's chopped, jumbo marshmallows. 


My mom always begs us to take the houses home, but they usually wind up adorning her buffet table all season long.   

We always have SO much fun.  It's one of my favorite family traditions, and I have no idea how it started.  It's a wonderful way to get in the mood for the Christmas season.

my sister, Carrie, showing Levi what he gets to help make next year

Sunday, November 18, 2012

Mom's Monday Mingle!


Welcome to Mom's Monday Mingle!

Would YOU like to "Co-host" with us?
E mail Jessica athometake2@gmail.com


Last week we had 195
Moms ready to mingle!
Please help spread the news on this growing hop!
Please tweet about this hop!
RULES:
1. Please follow each hostess. They are 1-6 in the list!
2. Leave a comment if you are new and want us to return the follow.
3. Grab the button and display it on your sidebar or link it to the post.
4. Have fun and meet new friends!
Black Dots page break divider


Cranberry Brie Muffins

Brie, how I love thee. 

I went to a Thanksgiving potluck recently, and wanted to make something with cranberry sauce.  I found this recipe in one of my favorite cookbooks (Cupcakes, Cookies, and Other Tempting Treats).  There was no way I could pass up trying it! 


Ingredients:
6 T butter (melted and cooled) or sunflower oil plus extra for greasing
2 C all-purpose flour (or gluten-free flour)
1 T baking powder
1/2 tsp baking soda
1/4 tsp salt
pinch of freshly ground pepper
5.5 oz/150 g Brie, finely cubed
2 eggs
heaping 1 C plain yogurt or kefir
4 T Pacific Natural Foods Organic Sauce, Whole Berry Cranberry, 15.6 Ounce (Pack of 12)

Directions:
Preheat the oven to 400°F.  Grease a 12-hole pan (or a 24-hole mini muffin pan).  Sift together the flour, baking powder, baking soda, salt, and pepper to taste into a large bowl.  Stir in the Brie.

Place the eggs in a large bowl and beat lightly, then beat in the yogurt and butter.  Make a well in the center of the dry ingredients and pour in the liquid ingredients.  Stir until combined; do not over mix.  Spoon half of the batter into the muffin pan.  Add a teaspoon of cranberry sauce to the center of each, then spoon in remaining batter.

Bake in the preheated oven for twenty minutes, or until well risen, golden brown, and firm to the touch.  Let cool in the pan for five minutes, then serve warm. 

Notes:  I used kefir, and it came out great!  Don't get impulsive and add a pinch of allspice like I did.  It would have been better without it.  I put a little more cranberry sauce in each muffin than it called for, and I'm glad I did.  It made them more moist.

 cubing the brie

 mixing brie with flour
 This says Thanksgiving to me.
 filling the muffins with cranberry sauce

Do you have a favorite recipe using Brie?

Happy Thanksgiving!

Thursday, November 15, 2012

Homemade Chocolate Syrup

I have been on a smoothie kick lately.  One of my favorites is a chocolate strawberry smoothie (frozen strawberries, kefir, chocolate syrup, half and half or milk, and ice), BUT I was using a premixed powder. I wanted something a little better, so I made my own chocolate syrup, and love the way it turned out!


I found a recipe on diynatural.com, but changed it a little according to what I had in my pantry.  You probably already have these ingredients in your pantry, too!

Ingredients:


  • 1 cup Wholesome Sweeteners Organic Sucanat Brown Sugar -- 2 lbs
  • 1/2 cup Navitas Naturals Organic Raw Cacao Powder, 16-Ounce Pouches (Pack of 2) , packed
  • 1 cup water
  • 1/4 tsp homemade vanilla extract
  • 1/8 tsp Real Salt Sea Salt - Pouch, 26-Ounce
  • 1/4 tsp baking soda


  • Directions:
    Pour water into a saucepan and stir in cocoa (until dissolved) over medium heat. Add sucanat and continue stirring. Once mixture is boiling reduce heat to medium-low, continue stirring, and set timer for 4-5 minutes (the longer you cook the thicker it gets.) Once your timer goes off remove from heat and stir in vanilla extract and salt and let cool. As it's cooling, mix in 1/4 tsp. of baking soda.  This prevents sugars from crystallizing if the syrup is going to be stored in the fridge for more than a few weeks. It will foam a bit at first, but returns to normal during refrigeration. As the chocolate syrup cools it will thicken more, so if it is already thick enough then bottle it, seal it, and stick it in the fridge. You can store the syrup in a pint mason jar or any other jar you like.

    This recipe will yield approximately 10 ounces of syrup depending on how long you reduce the mixture over the heat.

    This syrup can last in the refrigerator for a long time, so it makes a great gift.  I dressed up an old jelly jar with raffia and a simple gift tag. 

    There are so many uses for this syrup:
    ice cream topping, smoothies, baking, chocolate milk, crepe/waffle/pancake topping, milkshakes, etc! 

    Wednesday, November 14, 2012

    Homemade Chocolate Lip Balm

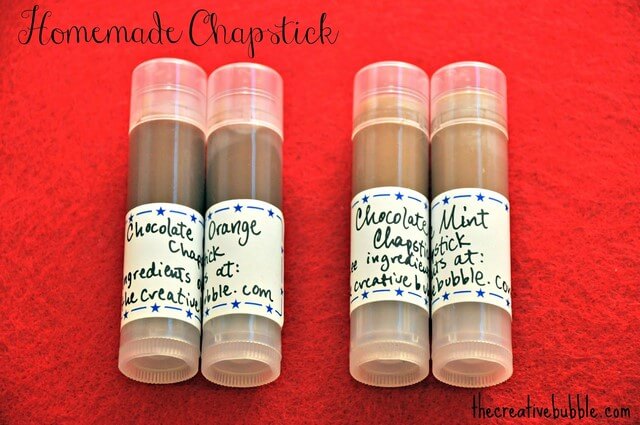
    For Christmas gifts this year I decided to make homemade lip balm .  It was so hard to decide which flavors I wanted to make, but I ended up going with chocolate, Wild Orange and chocolate mint and couldn't be happier with the results!  They smell (and taste) so yummy! 


    I rounded up all the ingredients over time.  Earth Fare near my house actually sells every item in the recipe, except for the essential oils from dōTERRA.  You can also find several of these items on Amazon.

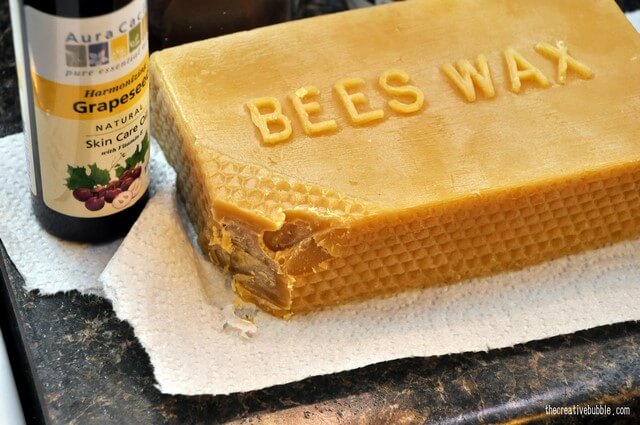
    Look at that beautiful bees wax bar.  Oh, the possibilities!  I still have a ton of bees wax left even after making ten tubes of chap stick.  (You don't need the Grapeseed oil for this recipe.)


    I ordered ten new chap stick tubes on ebay. 


    Chocolate Mint and Chocolate, Wild Orange Lip Balm Recipes
    Fills 10 regular size chap stick tubes

    Ingredients:
    Directions:
    Place the cocoa butter in a double boiler, and add the coconut oil. Heat over very low heat for twenty minutes, stirring occasionally.  Add the beeswax and stir well. After the beeswax has completely melted, remove the mixture from the heat and add the honey, vitamin E, and cocoa powder, whisking well the whole time.  Divide the mixture into two parts.  Be sure that you transfer to a warm dish of some sort or the mixture will begin hardening too quickly.  Work quickly after dividing mixture.  Now, add three drops of Peppermint oil to one half and five drops of Wild Orange oil to the other half.  After everything is incorporated and smooth, transfer to lip balm tubes or tins and allow to set for 3 hours.

    Melting the beeswax into the coconut oil and cocoa butter.

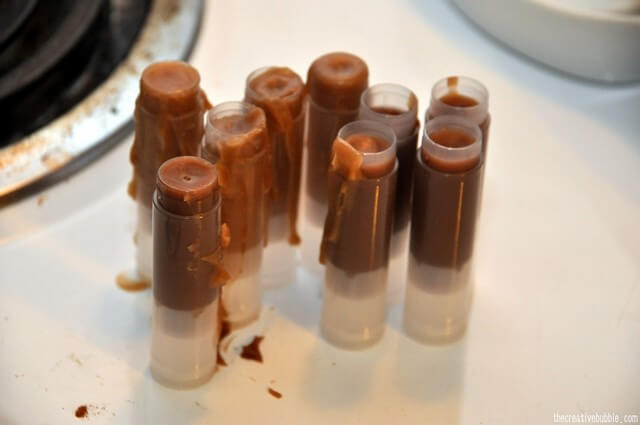
    Before you run into a bind like I did, plan what you will use to pour the chap stick into the tubes or tins ahead of time.  I used a funnel and well... this happened .  There are chap stick making tools available to prevent this!  ...but it was pretty easy to clean with a dry paper towel.  On the other hand...do not try to wash your beeswax covered dishes with water and detergent!  I spent forever trying to get the oil off.  Turns out it is best to wipe everything down with a dry paper towel, then wash with soap and water.


    While you wait and wait for the chap stick to fully set, try to avoid touching it, because it will take the sheen look off the top.

    Once it hardens, you can play around with labels.  I used some I had lying around from another project.  They were the perfect size. 


    This recipe made ten lip balms.  I am giving nine away as Christmas gifts, and I kept one for myself.  I couldn't stand not having one, too!  I love it! 

    I think this project was pretty easy.  The hardest (and funnest part!) was deciding on flavors. 

    Which kinds of chap stick have you made?


    This post was featured on:

    Tuesday, November 13, 2012

    Homemade Fleece Scarves

    Making fleece scarves is so easy, but don't tell the people I'm giving them to for Christmas this year.


    What you will need:

    fleece (whatever size and color you like)
    good scissors
    measuring tape

    Directions:

    I bought forty inches of polka dot fleece fabric.  I used a tape measure to mark off eight inch sections (giving me five scarves total). 

    Measure your fabric to the width you'd like your scarves to be.  Fleece tends to curl up on the edges sometimes, so be sure that you measure it wide enough to make up for that.

     
    Next, begin cutting length-wise.
     
    Once you have a scarf cut out, you can cut the fringes.
     
     
    Measure how long you want the fringes to be.  I did 3.5 inches for mine. 

    I have made fleece scarves where I've tied the fringe in knots, but I've found that I actually like them more just left alone like this.  The knots really thin the fringes out a little too much, I think.

    These make really nice Christmas gifts or a gift to yourself.  I've made a few colors for myself, and really enjoy matching them to different outfits.  There are lots of fleece colors and patterns to choose from, and they are very inexpensive to make. 

    I would love to see what colors and patterns you choose!

    Friday, November 9, 2012

    Frozen Chai Dessert Drink


    I have some friends who owned a cozy, homey coffee shop in Spring Hill, TN called Utopia .  Every time I visited, I had to order some of Seth and Christine's feta garlic dip and a frozen chai.  I'm not exactly sure how they made it, but I do crave that amazing drink from time to time.  I thought I would try to make something similar to cure my current craving !   


    Ingredients:
    8 large ice cubes
    1/2 C half and half
    4 T homemade chai concentrate (or store bought)
    2.5 T homemade, unrefined powdered sugar
    1/8 tsp homemade vanilla extract or seeds from half of one vanilla bean (I used the vanilla bean)

     Directions:
    Blend all the ingredients together except for the powdered sugar.  Add that last, so that you can determine how sweet you want it.  It should turn out to be the consistency of a semi-thin milkshake. 

    This is one of my favorite dessert drinks ever!  I hope you enjoy it.


    Here are some of my other chai recipes: Chai Cookies with Caramel Icing


    Chai Italian Soda


    Homemade Chai Concentrate


    Wednesday, November 7, 2012

    DIY Boot Socks


    I love the look of boot socks. I figured that my favorite boots deserved some boot socks to go with them. Where on earth would I find a cheap pair though? Turns out you can make your own boot socks from old socks!  This is a great way to save money. 

    So, I found two pairs that I thought would work:

    -one long pair of soft, bunchy tan socks (tall socks don't require any cutting).  They look pretty dorky here, huh?
     
     -...and these old, green shorter socks (I cut and sewed on these.)


    We'll start with the tan socks, because they are simple.  Just find some tall socks that will hang out over your boots a bit.  You can bunch them up at the top like I did here.
     
    No use spending money on boot socks when you might already have something in your drawers that will work!
     
     
    The green socks required a little more work than that.
     
    First, I hand sewed the tops down so there there would be a fold to add some character and also some thickness. 
    You can see the type of threading I did below.  It was fast and easy!
     
    Next, I sewed buttons to the folded top area.  I found four buttons that were a close enough match.  Then, I cut the bottoms off.  Why did I cut the socks, and not just wear them how they were?  They were too short to come over the boots.  They look pretty rough, but they turned out cute!
     
     
    That's all there is to it.  Below is a picture of how the boot socks look underneath it all.  I guess it's kind of like wearing a mock turtle neck.