Tuesday, November 26, 2013

Jonah's Journey

I have wanted to share this for a while, and am just now getting to it.  This is a photo journey I made for Jonah when he was around 3 months old.  He is now 9 months old.  I will always cherish this!  Please don't let the words distract you!  I wrote the "story" in a hurry, and am probably going to re-write it later.  :)  Enjoy!


Jonah's Journey - slideshows


Felt Food Part One (No Sew)

Making felt food or things for our felt board has become a great outlet for me.  It's really soothing to sit down, and let my creativity have a chance to run wild all while making something that my boys will (hopefully) like.  I haven't yet made anything with felt that requires sewing.  I hope to enter that arena when I get the courage!  Why do needles, thread, and sewing machines intimidate me so much?  I'll hopefully get over it eventually.

So, here are a couple no-sew felt food ideas for you: pizza, salad, and spaghetti and meatballs .  They are ridiculously easy, and lots of fun for the kids (They never notice the lack of sewing.), because they can also unleash their creativity (which comes pretty naturally!) by mixing and matching foods.


These are really fun to use at children's parties, because they can all make their own foods however they want.  The pizza is probably the best for that, because of all the toppings.  I think throwing the spaghetti in the air is my toddler's favorite thing to do.  There are so many ways you could expand on these ideas as well.

I'm sure we will come up with some more fun foods.  Do you have any that you like to make?

We just made a felt Mr. Potato Head, so I'll have to share that soon, too.

How-To Below

You will need these items:
Scissors
Felt
Yarn

Felt colors for the pizza:
tan, red, dark red (for pepperonis), white, green, and yellow

Felt colors for the salad:
two or three different greens, white, red, orange

Felt colors for the spaghetti:
red and brown

You will use tan or cream colored yarn cut into strands for the spaghetti.
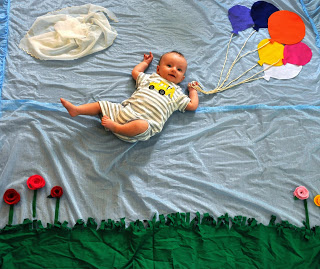
Pizza:
Cut a round, tan circle for the crust, and a red, smaller circle for the sauce.  Then, cut small, white pieces to look like cheese.  You can add yellow peppers or pineapples, green peppers, and red pepperonis.
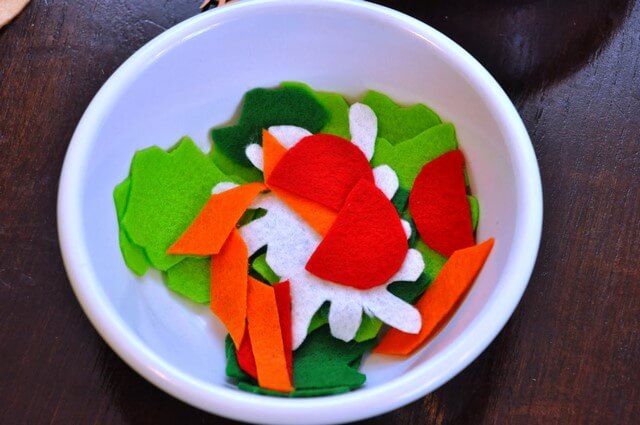
Salad:
Cut jagged pieces for green lettuce, a white "blob" of ranch dressing, and then add your red tomatoes and orange carrots.
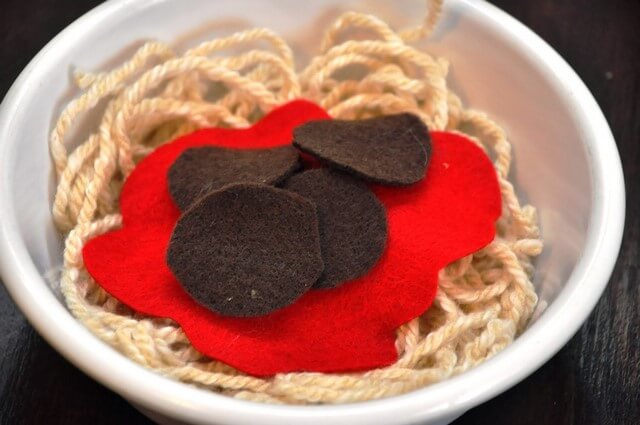
Spaghetti:
Cut the yarn into small strands.  Next, add the red "blob" of sauce on top of that with a few brown meatballs.


Saturday, November 23, 2013

Bathroom Remodel

Hey everyone!  You may remember my post titled, "Our 60's Charmer".  We have finally reached a point where I'm not mentally exhausting myself and husband with what needs to happen next to fix this place up.  There is still more to do here (what house couldn't use a power washing or a little paint here or there?), but it looks great for now.  Now (until Spring arrives) we plan to rest for a while.

I want to share our bathroom remodel today.  It was my least favorite room before, and now it looks much better and actually stylistically fits into this decade.

BEFORE pictures below

I can't believe I only got a handful of "before" pictures!  It was bad in there.  Trust me.  Do you see in the picture below that if someone was on that toilet, their legs would pretty much touch the vanity to the left?  "A little cramped" is an understatement.


Like those sea shells?  They adorned much of the wall under the mirror above the sink.

This picture is just to give you an idea of how the Formica looked up close.  I was doing a project in there, hence the saran wrap all over the walls.


AFTER pictures below

You may notice these changes:
new wall color
new vinyl floor
added baseboards (They were plastic before.)
new towel hook, curtain rod, shower curtain (...which took me a decade to pick out.  Who knew curtain shopping was such serious business?), toilet paper holder, shelf above toilet, vanity lighting, medicine cabinet mirror above sink, vanity, faucet, linen towers, doors and knobs, tub and shower faucets (not pictured), and various decorations


 Am I a dork?  Yes.

 I see now that corner needs a plant where the pumpkin is.  I think my toddler might spill the dirt everywhere, so scratch that.  The candle on the shelf way up there is actually my husband and my unity candle from our wedding.  We try to remember to light it each year on our anniversary.  I think we have remembered two out of five times.  :/


So, although our one bathroom house has this tiny, little bathroom, we now have ample storage thanks to all of our cabinet additions.  I am grateful for the updates in this room.  It makes up for the fact that we constantly have small toddler toilets and toys scattered about.  

I will keep posting our home updates room by room.  The kitchen needs a few small adjustments, then it'll be ready.  It's a big change.  

Tuesday, November 12, 2013

Homemade Poptarts

I've never been a huge fan of store bought poptarts, and especially not lately since they have lots of icky ingredients in them unless you buy the organic versions.  So, when I found out that you can make your own poptarts at home, I had to try it.


Directions:

-First, I started with a basic pie dough recipe from Betty Crocker:  Betty Crocker Pie Dough Recipe (I like to use eco-harvested organic palm shortening in these.)

-Then, I cut the dough into small rectangles, ensuring that each was the same size in order to stack them.

-The fun part is picking out your fillings!  I chose these combinations: chocolate hazelnut butter and strawberry jam, peanut butter and chocolate chips, and strawberry jam and chocolate chips.  I loved each pastry, but the peanut butter chocolate was my favorite by far.  Choose anything you like!  Try to put a small amount of filling into each pastry, so they don't explode.  Leave room on the edges for crimping.

-Use an egg wash to attach the top and bottom rectangles to seal in the filling like you would with ravioli.  You can then use a toothpick to crimp the edges.  *It's really cute when you use a small cookie cutter, and cut out a shape in the top pastry before setting it on the bottom one.

-Bake at 350ยบ until golden brown on the edges.

-Remove and allow to cool before serving.  You can also add toppings to the pastries, like:
royal icing, thickened buttercream icing (colored with natural India Tree food colors), chocolate ganache, drizzled chocolate, sprinkles, etc...

You can use this recipe for unrefined homemade powdered sugar.


You can make mini poptarts and stick Popsicle sticks into the bottom of them.  They are adorable for parties.


Enjoy!  I'd love to hear some of your filling ideas.

Below are some pictures of the poptart making process :)


Friday, November 8, 2013

Pocketful of Acorns

My two year old son's tiny khaki pants were sitting on top of the pile of dirty clothes, and just before I threw them in the washer, I remembered to check his pockets.  His preschool teacher told me that he was picking up acorns, and might have stashed some.  This was the first time I'd ever thought to clean out his pockets.

I discovered a couple of whole acorns and some acorn pieces.

Now, I know it might be silly, but I was so moved by those little acorns that he had decided were special enough to keep safe in his pocket.  Throughout the coming years, I will surely remove things like worms, leaves, candy, love notes, money, and keys, but today...  Today, I got to hold in my hand these precious acorns that even I as a child thought were treasures.

It reminds me of how innocent and wondrous he is, and how big the world is to him.  He values acorns.  He values clouds and crickets.  He loves God's creations.  He takes the time to admire them, which makes me admire him even more.  

I will forever remember his first pocketful.