Friday, November 7, 2014

Hello Again

In the past few months, I have dreamed of what I'd write about in a "resuscitating the blog" post.  Well, here it is.

Why I let this page fizzle out:

My second son was born in February of 2013.  Precious as he and his brother are, I let blogging ideas pretty much consume my thoughts.  I was fixated on coming up with great posts, so much so, that I would plan entire days around completing crafts or making foods that I wanted to write about.  It was daunting, tedious, and there ultimately wasn't much to gain....without a great deal more work.

When people say, "Don't blink!  Your babies will be grown before you know it," I feel rushed to suck up all the joy and cuddles that one can fathom.  It is a pressuring phrase!  But...it is true.  They do grow quickly, and I needed to spend that first year and half of little Jo's life focusing on him and his big brother.  That decision prevented a great deal of stress, believe it or not.  Being present for my babies has been so wonderful and rewarding.

You know what else?  I was afraid of coming across as a show-off, narcissistic, know-it-all with the material I was posting.  Doing arts/crafts and coming up with recipes are two things I deeply enjoy, but I never wanted to make any one (especially moms) feel that they were not "measuring up", because they weren't also spending way too much time trying to perfect something that they really didn't have the time to do, like I was.

I am very grateful to still have the ability to jump on here and write any time I want.  If I continue to create posts, the focus of the blog may shift a bit.  Reason being, my focus has shifted as well.

Monday, April 7, 2014

Homemade Nail Fungus Cream

If you have ever had nail fungus, then you know it can come out of no where, it doesn't mean you're a "dirty" person, and it never wants to leave once it finds a home in your nails.  It is stubborn to say the least!

Many of the topical nail fungus treatments out there don't do the job, and they usually contain some ingredients that aren't safe during pregnancy.  

If you'd like to use a nail fungus cream that is sure to KNOCK OUT the fungus, then I recommend making your own using essential oils.

This stuff is strong , and you can be confident that it will kill the fungus.  

Here is the recipe:
1/3 cup of melted coconut oil
25 drops of Oregano essential oil
20 drops of Lemongrass essential oil
20 drops of Malaleuca essential oil

Melt the coconut oil over low heat in a double boiler or just stick it in a bowl, and put it outside on a hot day.  Then mix your essential oils into the melted coconut oil.  

It may take several days for the coconut oil to re-solidify, because of the low viscosity of the essential oils.  You can see in the picture above, that my mixture is still not completely solid. 

How to use this cream:
Cut the infected nail down as far as you can without pain.  Use a fresh q-tip to apply the cream generously to the nail, twice daily, for at least two months.  It is vital to stick with it, or the fungus will just go ahead and have a party in your nail bed again.  You may not see results for up to a year, because the nail has to grow out completely to fully eradicate the fungus.  Dr. Weil also recommends eating 1-2 cloves of raw garlic daily, as it contains significant anti-fungal properties.  

Why it works:
Oregano, Malaleuca, and Lemongrass essential oils have very strong anti-fungal, chemical compounds.  Plants have to defend themselves against bacterial, fungal, and parasitic predators, to name a few, so it only makes sense that the oils they produce, have the power to also help us to fight off these things.  Oregano, for example, is such a potent anti-fungal, that it is capable of destroying resistant, mutated fungi, which result from strong antibiotic therapies.  


Saturday, April 5, 2014

How to Clean Your Dishwasher Naturally

The dishwasher and washing machine are a couple contraptions I never really thought I needed to clean before I became the keeper of our home.  I mean c'mon; aren't they supposed to clean themselves while they clean our clothes and dishes?

It turns out that there are a lot of ways these overly used machines can get gunky.  Grease, soap scum, pieces of food, etc. can coat the inside walls and corners.  This can make them look dingy and smell stinky.  It can also decrease their efficiency, so cleaning them about once every other month is a good idea, and may even release your inner cleaning super woman!

I will be doing a post in the future on how to clean your washing machine, but today I'm going to tell you how I clean my dishwasher.


You will need:
-two coffee cups
-enough white vinegar to fill both of the cups
-an empty, icky dishwasher
-Citrus Bliss essential oil or essential oil of choice
-baking soda
-Domo is optional, but he is a good cheerleader.

1.)  Empty your dishwasher completely, then take out the bottom rack and make sure there is nothing gross lingering down on the bottom.  You'd be surprised about what you can find!

2.)  Place one cup on the bottom rack and one on the top, then fill them with white vinegar.

3.)  Drop four or five drops of essential oil into each cup.

4.)  Turn the dishwasher on its hottest cycle, then let it run the entire time.

5.)  Next, you can sprinkle one cup of baking soda on the bottom of the dishwasher floor, and run it on its hottest cycle again.

The vinegar helps to get in there and loosen grease and gunk, while it sanitizes and removes musty odors.

Citrus Bliss smells like Heaven, and can make your whole house (and dishwasher) smell glorious!  Why not clean with boring vinegar and baking soda, and have some delicious smells going on in there, too?  It really helps to add extra fighting power to eliminate odors in the dishwasher!

The baking soda does a lot of work, too!  It freshens the smell, and really brightens the dishwasher by removing the build-up that the vinegar didn't get.  The two work hand-in-hand.


Do you see those cute, little toes on the rug up there?  Oh, how I love my little guy!  My two-year old was "helping" to clean mama's dishwasher.

Citrus Bliss includes:
Bergamot, Clementine, Grapefruit, Lemon, Mandarin, Tangerine, Vanilla, Wild Orange

Tuesday, April 1, 2014

Homemade Diaper Cream

When I had my first son, it took me a while to finally settle on a good diaper cream.  We literally had tubes and jars of different creams everywhere in the house.  Not many of them worked.  Some had chemicals in them that I wasn't too fond of.

I WISH I had known that I could have very easily made my own!


It looks a little messy in that jar, but don't let it sway your feelings about using something this awesome!  I am in love with the simplicity and effectiveness of this recipe.

You will need:
1/4 cup unrefined, organic, extra virgin coconut oil
10 drops of Malaleuca essential oil
5 drops of Lavender essential oil
5 drops of Balance essential oil blend  (my favorite!)

In a double boiler, slowly melt the coconut oil, or you can just put it outside in a bowl on a hot day!  Mix the oil drops into the melted oil, then let it solidify.  For applying, I just use a q-tip.  This cream can also be used for other bothersome yeast infections.  

So, don't worry about getting that prescription cream or all those other diaper creams you're unsure about.  Just go ahead, skip it all, and give this a try.  I promise you'll be glad to have a jar of this at your house!  

If you aren't familiar with Balance essential oil blend, here is what it looks like.  It has so many uses, such as in this diaper cream and balancing mood (fighting anxiety) when used aromatically.


Sunday, March 30, 2014

Homemade Garden Tags

This is a fun, little craft that you can include the kids in.  One recent, boring day we got out a bushel of supplies, plopped it all on the kitchen table, and got to work making garden cards for our Spring (if we ever get it planted!) garden.


You will need:
popsicle sticks (large or small)
sturdy colored paper
glue
scissors
seed packs for inspiration
laminate covers

We picked out a few seed packs that would be fun to turn into tags, and cut out the corresponding shapes to match.  Each fruit or vegetable cut-out got its own background, then was laminated (at the same time as all the others).  We then glued popsicle sticks to the back of the laminated cards.

I meant to label them before laminating, but I might just write what they are on the sticks.  I think they look kind of nice without any writing as well.  Below are some pictures that show the process.

My guys really liked being involved, because they got to play with paper, glue, and (kid-safe) scissors.  They aren't old enough to cut out the shapes yet, but I imagine that this would be a really fun thing to do with older kids.


 It was St. Patrick's Day, hence all the green!


Linked up with:
Simply Designing | Ginger Snap Crafts | Lady Behind the Curtain | Creations by Kara Someday Crafts | Life with the Crust Cut Off |  The Turquoise Home

Thursday, March 27, 2014

Homemade Mouthwash


I'm sure a lot of you know that most mouthwashes on the market do contain some pretty icky ingredients. This is a very simple recipe to make, and it does the trick without any toxic chemicals!

Homemade Mouthwash

1/4 cup distilled water
10 drops of peppermint essential oil
5 drops of malaleuca essential oil
3 drops of clove essential oil
3 drops of rosemary essential oil

Mix this up very well before each use, as the oils and water naturally separate.  I just used an empty vanilla extract container that I've had for a while.

Your breath will smell so fresh after using this mouthwash each morning!  There are other homemade mouthwashes out there, but this recipe is my favorite, because it's so easy to make, the ingredients are easy to find, and it really works.  The malaleuca will aid in killing nasty germs, too.  Did you know that if you have a cold sore, it can also help get rid of it?

Malaleuca is known to be:
  • Analgesic
  • Antibacterial
  • Anti-fungal
  • Anti-infectious
  • Anti-inflammatory
  • Anti-parasitic
  • Antiseptic
  • Antiviral
Don't forget to keep it out of children's reach.


Linked up with:
Simply Designing | Ginger Snap Crafts | Lady Behind the Curtain | Creations by Kara Someday Crafts | Life with the Crust Cut Off |  The Turquoise Home

Tuesday, March 11, 2014

"Dirt and Worms" Sensory Activity


This is so much fun for the kids!

Making a "Dirt and Worms" Sensory Activity for your kids is fairly easy.  All you will need is:

coffee grounds (for the dirt) Cheap coffee will work. :)
cooked spaghetti noodles (worms)
raisins (bugs)
some grass, flowers, weeds, etc.

I just put all of this into a large tupperware, and my boys loved it.  They threw the worms up in the air, and scattered coffee grounds EVERYWHERE.  I think I developed an eye twitch, trying to keep it away from the carpet, but their smiles were worth it!

This activity is pretty baby-friendly (if you leave the grass, flowers, and raisins out).  Most of the "ingredients" are edible and non-toxic.  Just watch out for baby eating the pasta, and getting a caffeine rush.  Mine had to sample the spaghetti, and seemed to be disgusted by it, but kept eating more.  Mom of the year here.  Yep, that's me.  I let my kid eat coffee coated spaghetti.

I got this idea from my favorite kid-friendly learning blog: Fun at Home with Kids


Sunday, March 9, 2014

Ranch Dressing Mix

Have you ever made ranch dressing mix from scratch?  It's really easy, and tastes even better than store-bought dressing in my opinion.  You know exactly what is going into it, too!


Here is how you can make the dried mix, which can be stored for a long time, until you decide to add the wet ingredients.  

This recipe is to be mixed with 1 quart of wet ingredients.


Homemade Ranch Dressing Mix

Ingredients:

2 Tbsps. dry parsley flakes
1 Tbsp. dry onion powder
1/2 tsp. black pepper
1/2 tsp. garlic powder
1/2 tsp. salt
1/2 tsp. dry dill
1/4 tsp. sweetener of choice (like sucanat)

Salad Dressing:
Mix with 1 cup of sour cream, 1 cup of mayonnaise, and 2 cups of buttermilk or kefir.

Vegetable Dip:
Mix with 1 quart of sour cream, yogurt, or Greek yogurt.

For a thick spread: 
Mix with 1 cup of mayonnaise, 1 cup of sour cream, and 16 oz. softened cream cheese.

Ranch Avocado Dip:
Mix with 1 cup of pureed avocados, 1 cup of sour cream, and 2 cups of buttermilk or kefir.  Add a little cayenne if you like!

Chipotle Ranch Dip:
Mix with 1 cup of sour cream, 1 cup of mayonnaise, and 2 cups of buttermilk or kefir.  Add 2 tsp of chipotle chili powder and a pinch of cayenne.

Notes:

-You can play with other herbs to customize it to your likes.  For instance, I like to add a little cayenne every now and then.

-The flavors blend together and taste best if the dressing, dip, or spread is mixed up the night before and kept in the fridge overnight before use.

-Unless you add some homemade whey as a part of the wet ingredients, the dressing will only last about two days in the fridge, even if you use homemade mayo.  The friendly bacteria in the whey will help maintain the freshness for much longer.  Just mix the whey into the other wet ingredients, and let it sit on the counter overnight before refrigerating.


Tuesday, March 4, 2014

Calendula Infused Oil


I'm in love with Calendula flowers.  I got a free pack of seeds with a Calendula baby body wash once, and have grown them ever since.  They are very easy to grow and take care of.

You can find Calendula seeds here: Seeds of Change S14529 Certified Organic Orange Zinger Calendula

Calendula officinalis :
-also known as pot marigold or garden marigold, has been used for centuries to heal wounds and skin irritations

-Calendula has anti-inflammatory, antimicrobial, astringent, antifungal, antiviral, and immunostimulant properties .

-It is useful for disinfecting and treating minor wounds, conjunctivitis, cuts, scrapes, chapped or chafed skin, cradle cap, bruises, burns, athlete’s foot, acne, yeast infections, bee stings, diaper rashes, sore or inflamed muscles,  and other minor irritations and infections of the skin. 

-Plus, it stimulates the production of collagen at wound sites to help minimize scarring and assist with stretch marks

-This versatile botanical can be incorporated into baths, creams, compresses, washes, salves, ointments, massage oils, baths, facial steams, tinctures, and teas. 

-It is also gentle enough to use for babies, children, or animals. 

-Internally, gargling with Calendula infused water may ease a sore throat, sores in the mouth, and inflammations in the mouth and throat -Source

This medicinal oil is simple to prepare and has so many uses. The gentle, soothing, and healing oil can be used alone, or incorporated into salves, massage oils, lip balms, ointments, creams, and lotions. 

How to Make Calendula Infused Oil:

You will need:
organic olive oil
organic dried Calendula flowers

1. Place Calendula flowers in a clean, dry glass jar. Too much moisture will cause the oil to go rancid, so that is why it is a good idea to dry them for at least three days before adding to the jar. Pour olive oil into the jar, making sure to cover the flowers by at least 1” of oil so they will have space to expand. Stir well and cap the jar tightly.

2. Place the jar in a warm, sunny windowsill and shake once or more per day.


3. After 4-6 weeks, strain the herbs out using cheesecloth. Pour the infused oil into glass bottles and store in a cool dark place.


This is my own personal method for drying flowers.  It looks kind of pretty.


Stay tuned to see how I like to use Calendula oil in an upcoming  "Healing Lotions" series.  

Wednesday, February 19, 2014

Unrefined Homemade Powdered Sugar


As you may all know, I have a serious sugar addiction that I am battling.  I give up sugar one week, then I'm back on it the next!  So, if I get to eat sugar, I'm at least trying to eat unrefined instead of white, refined sugar.

This recipe is insanely simple.  It's not even really a recipe.   To make homemade powdered sugar , all you have to do it to put a granular,  unrefined sugar , such as sucanat, coconut sugar, etc. into food processor, then blend it until it's smooth and powdered.

That's it!

The color of your sugar will vary based on which type of unrefined sugar you choose.  Most of them will turn out looking slightly brown .  I tried to use mine in a frosting recipe, but it looked like a gross chocolate frosting without chocolate.  What good is that!  You may as well go ahead and add the chocolate , so I did.

You can use this homemade powdered sugar in SO many recipes!

Wednesday, February 12, 2014

Tales from the Crib

My dad is in the furniture industry.  He gives us the scoop on certain things like furniture safety with children.  You all may already know that kids can easily pull televisions and dressers over onto themselves, which can be extremely dangerous and sometimes fatal.

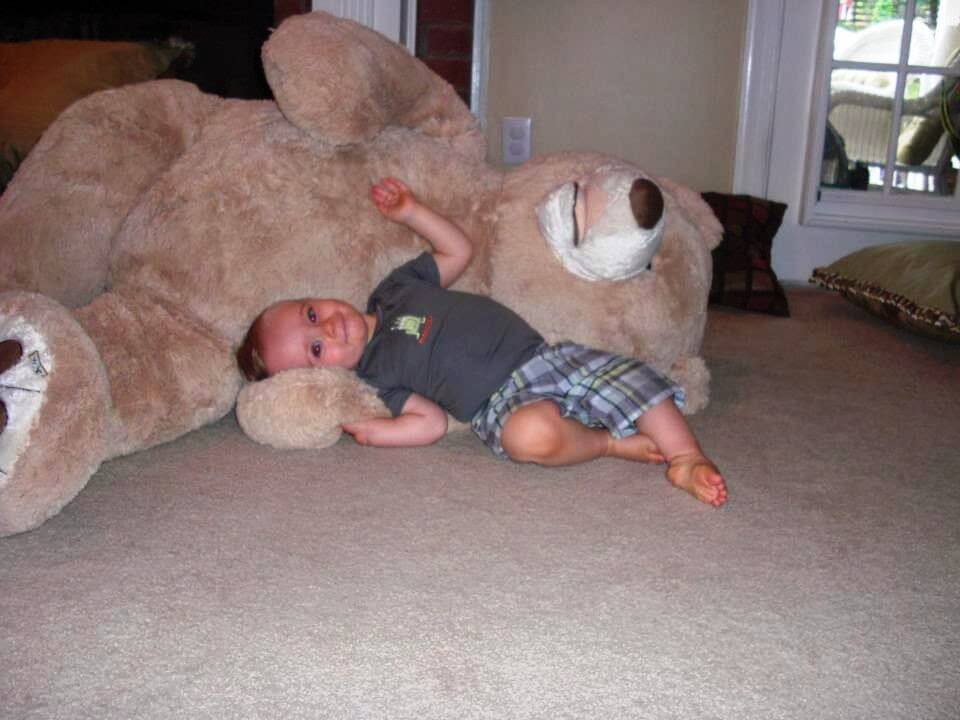
All of that being said, we still had a close call with my older son and a dresser not too long ago.  It was terrifying to hear the loud crash in his room, but before I tell you the whole story, I'd like to introduce you to Theodore.  He is the excessively large teddy bear you see in the pictures below.  He was given to us by a dear friend of my parents, and has become a member of our family.  


To cut to the chase, Theodore may have likely saved our little Levi's life.  

He was supposed to be napping one afternoon, but was rummaging around his bedroom instead.  I believe he was in a state of joy and shock that he was allowed to roam freely following the recent transition that we'd made from crib to toddler bed.  

Two days prior, I had ordered a lot of furniture and television safety brackets online, and was waiting so that we could install them, but honestly I never imagined that Levi could actually even pull any of the furniture in his room onto himself.  I thought I was just being "overcautious."  

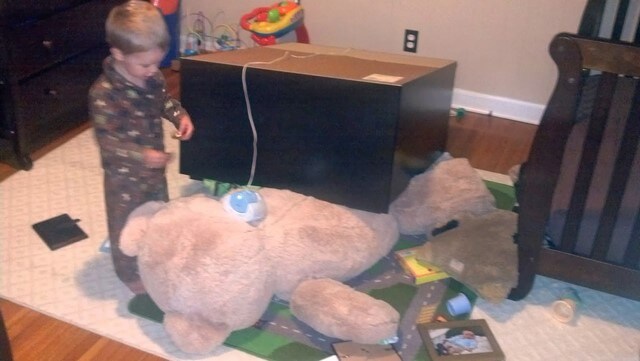
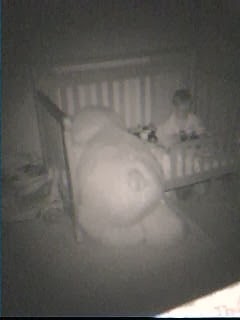
I heard the loud thud as I was finishing a load of dishes.  I literally sprinted to his room, and found him under his dresser.  My heart dropped.  This is a short dresser I'm talking about, one that you'd maybe never even consider harnessing.  He had apparently pulled the drawers out, and climbed into them, which made it tilt forward.

Amazingly, my child crawled out smiling.  What had happened was a miracle.  Theodore had been propped up against the dresser, and bravely took the brunt of the impact.  Thank you Theodore!  Levi came out unscathed, and his big, fat bear served a great purpose that day.  I took one picture of the aftermath.  You can see it below.


Levi was on Theodore's side, both of them directly under the dresser when it fell.

I'm so happy my little buddy was okay that day.  I have felt like I needed to share this story for a long time now, as a sort of warning for anyone out there who might be in the same boat that we were before we had brackets on everything.  

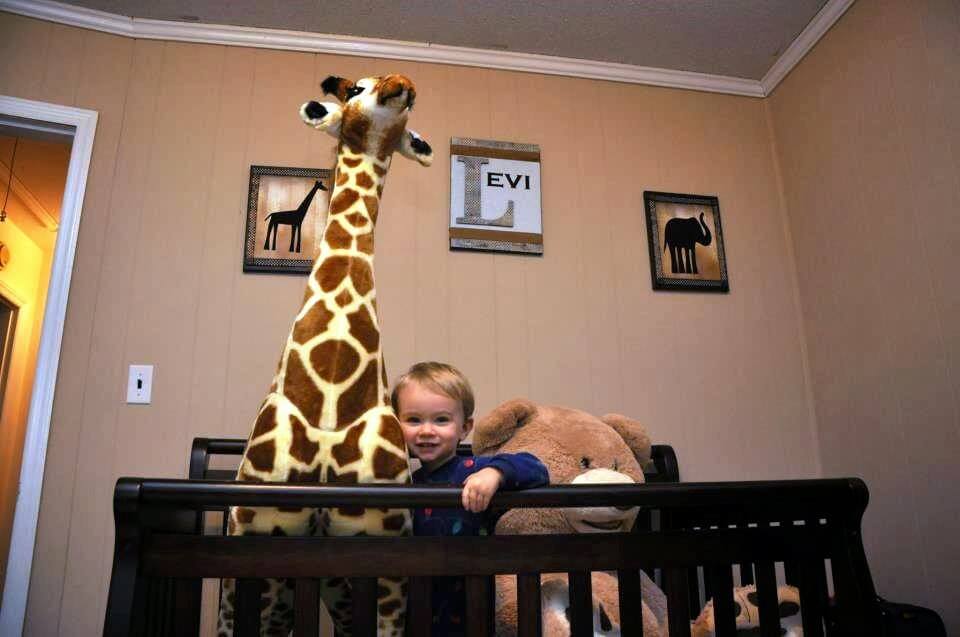
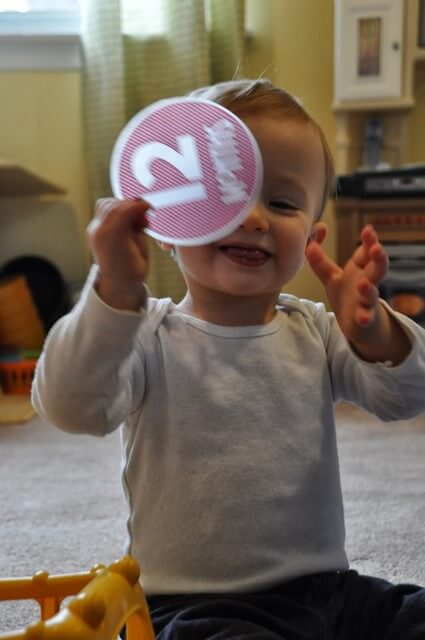
...and while I'm on the subject of cribs and toddler beds, I'd also like to share some of my favorite video monitor snapshots with you all.  You know, the crazy moments you catch while watching them "sleep", the creepy night vision eyes your kids get, the sweet moments, and the ones where you are extremely grateful that you can see what they're up to in their rooms...  Enjoy!  

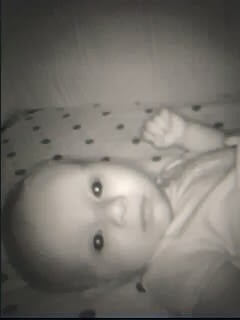
 You didn't really think I'd sleep in my crib, did you?


 lounging

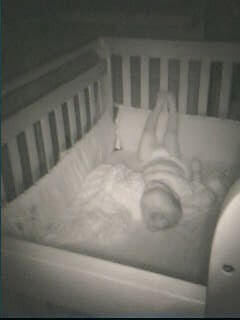
 Sleeping with your legs in the air is the best.

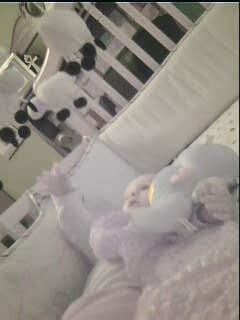
 Yep, that's a naked baby bottom.  He managed to de-robe himself all by himself.

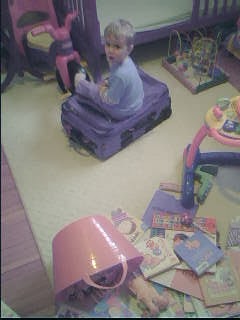
 Mom, it's okay if I turn the light on, destroy my room, and sit on this awesome suitcase instead of taking a nap, right?

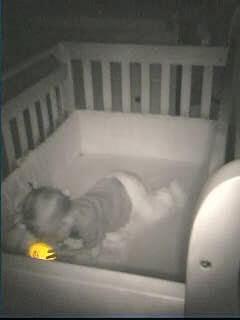
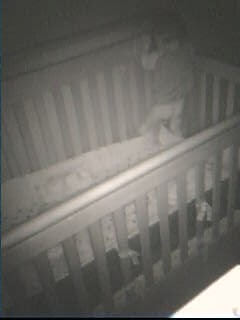
 I'm not sure how he got this ball into his crib.  Really, no clue.  It was on the floor beside his bed.  Apparently, he has skills.

Taking off shirts and wearing them on your head is so much fun. 

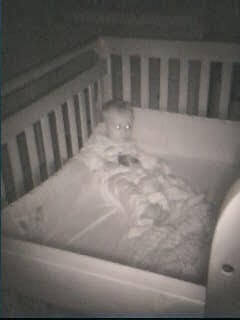
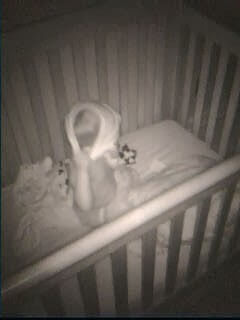
And finally, here he is hanging out in bed reading during "nap time" after doing a pretty dang, good job of pulling Theodore in to join him.  He's actually pretty heavy, too!


This post is also being used as an entry for a Dropcam (video monitors company) contest.  
If you’d be interested in participating in a fun blog campaign they're running, here's how you can take part. They are looking for stories of your children's best “Tales From the Crib!”
It’s pretty easy to get involved:
1. Post your “Tale from the Crib” on your blog.  They're simply looking for funny, surprising, or heartwarming stories about moms and their children.  If you have any pictures or videos to go along with it, they’d love to see those as well!
2. Email the link to your blog post to Tiffany at Dropcam, after it goes up, so that they can take a look at it:  tpham(at)dropcam(dot)com
Their community loves reading these stories, so they like to share the best entries on their social media accounts. If they pick yours, it will be shared with their 26,000+ active followers! They want them to shake, rattle, and roll in their seats, so please send them your stories!
  https://www.dropcam.com/baby- monitor


Monday, February 10, 2014

Whale of a 1st Birthday Party

I LOVE my baby Jo.  That's just how I had to start this blog post.  Jonah turned one last week, and we celebrated his birthday with loved ones this past weekend.  After hosting my first baby shower for a dear friend and an essential oils class in January, I felt ready to host one of my children's birthday parties at our house (also a first).

I think Jonah will probably get mad at me if I try to throw him a "Jonah and the Whale" party when he's older, so I took the opportunity to do it now, before he can put up a fight.  Plus, whales are cute and the theme was a good way to incorporate blue.

I found most of the whale supplies at Party City and on Amazon, and I made a couple of things, too.


So, above is the cake that I ordered for Jonah's smash cake.  I actually ordered it with no icing, so I could make my own with sucanat, which is pure, dried cane sugar juice.  Don't try to make a white icing with it (like I started to do!) or you will end up with an ugly brownish icing.  I surrendered, and added cocoa powder to make it a chocolate icing.  If my little guy is like me, he loved it, and the pictures do prove that to be true.  I will probably be doing a post in the future on how to make powdered sugar with sucanat.  I made the whale with fondant, but he didn't get to eat that part as I imagine he wanted to :)


Back to the birthday boy...here he is as a newborn, and also as a big boy at twelve months!  He likes to pull his month stickers off of his shirt as soon as I put them on to take his picture.  I was really sad as I put the month sticker sheets in storage, because it just means he's out of the "month counting", but I still get to rock him to sleep and hold him tight, because he is a cuddle bug!  I'm so grateful for that!

My sister-in-law and brother-in-law gave Jonah a book called "If I Could Keep You Little."  There isn't a more suitable gift (for me!) on his birthday than this book.  Have you read it?  We read it before bed last night, and I almost cried.  It's about all of the things that the parents would miss if their child stayed small and didn't grow up.  It made me want to live it up right NOW, and enjoy my boys to the fullest, because as I hear...they grow up fast.  So, today we pulled out their tent, since that is about their favorite thing on the planet right now to "live it up".  I also ordered a toddler craft book with a bunch of ideas, because we go a little stir crazy inside in the Winter, and mommy needs to get these boys into some fun activities.

Back to the party...
...here are some pictures of the event!

If you come across this post, and are doing a whale party yourself, please let me know if you have any questions about where I found any of the party supplies.

 Jonah's monthly photos 

My mom and Jonah, ready to party!

 Big brother had so much fun.  Today, he said, "Jonah wants to have another birthday party, and all the people want to come here again."  I think he's a social butterfly.


 That's the best picture I had of this.  It's made with scrapbook paper and felt.  It says, "Jonah is 1!", not to be confused with, "Jon H is 1!".


Jonah, Michael, and I

 He loved his cake.  I think I'm going to do a post called "Cake Monster", so all of you can see how messy he got.  He truly looked like a cake monster.  

 sweet boy opening his first gift


This is a book that I put some pictures of Jonah in to create a story for everyone to look at.

He was so sleepy by the time it was over.  

We had a fun day, and I think Jonah's first birthday party was a success.  He's one!!  I am still a little in shock by how fast this past year flew by, and by how tiny he still seems to me in my mind.   Happy 2nd year of life, precious baby Jo Jo!