
Please welcome my sister, Carrie, this week!
She is sharing her own recipe for dark chocolate cocoa almonds with sea salt and turbinado sugar. She lives in Franklin, TN with her husband and two dogs. I love her recipes and her great sense of humor. Enjoy!

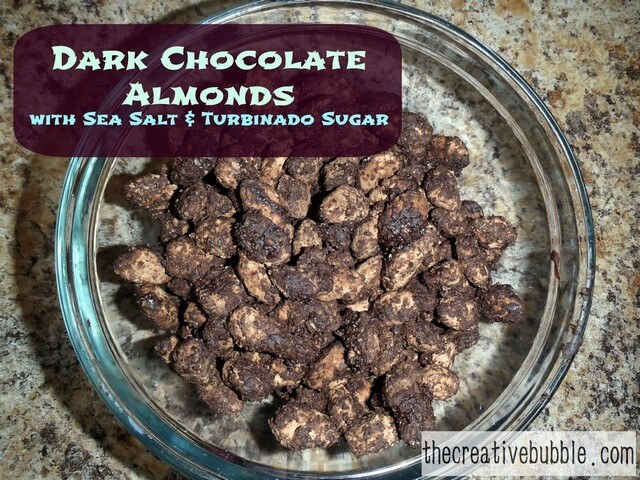
Dark Chocolate Cocoa Almonds with Sea Salt and Turbinado Sugar
If you like dark chocolate and almonds, this recipe is for you! I was inspired by something similar I got at Trader Joe's. You only need a few things to make these magnificent nuts.
Ingredients:
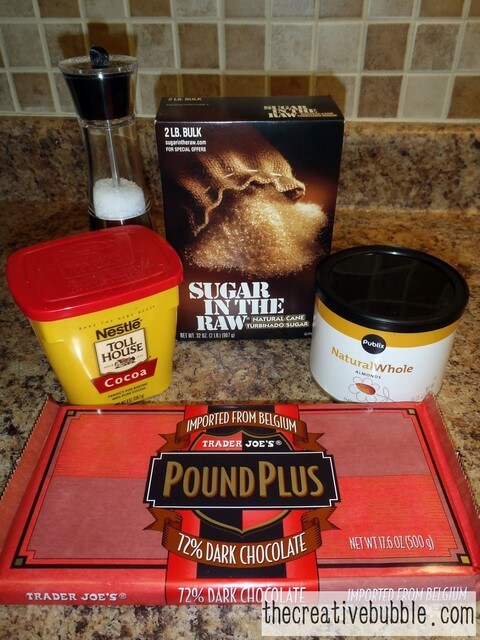
1. Raw Almonds (9 oz) - you could get roasted if you would like
2. Cocoa (1 cup) - I prefer non-alkalized cocoa since it is a little better for you
3. Dark Chocolate (1/2 pound) - you could use other types of chocolate. If you really like dark chocolate, make sure to use a kind that doesn't list sugar as the first ingredient.
3. Sea Salt (1-2 tablespoons)
4. Turbinado Sugar (1-2 tablespoons)
5. Trusty Side-Kick (optional)
P.S. - I'm not big into measuring things... for this recipe I just determine how much I need of everything as I go. The amounts above are "min" amounts meaning if you have at least that much of everything, it should be enough.
Other stuff:
You'll need a few pans and/or bowls to transfer the nuts. I just use a medium sized pan for melting the chocolate, two round cake pans for dispersing the cocoa (have at least one that is wide with high sides + a lid that will cover it), and a bowl to put the finished product in. A fork and slotted spoon are also helpful. I recommend you have all of these things ready before you get started.
Time to Make:
Hmm... in "Carrie Time" about an hour or so. So for everyone else, maybe 30-45 minutes.
Quick Steps:
STEP 1: Prepare cocoa, sea salt, and sugar mixture. Just mix it all up in that wide pan or bowl I mentioned earlier.
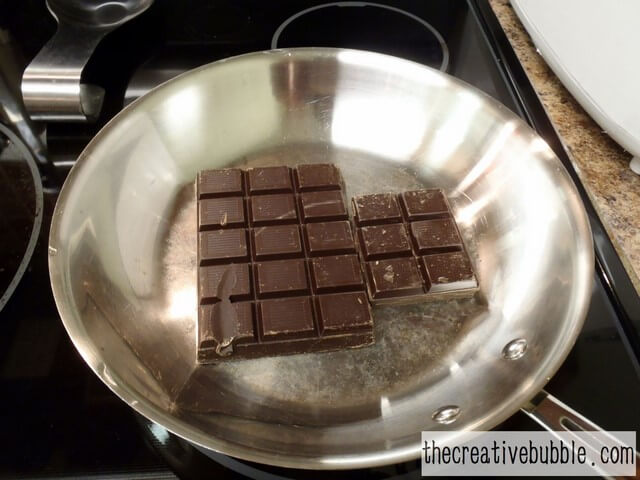
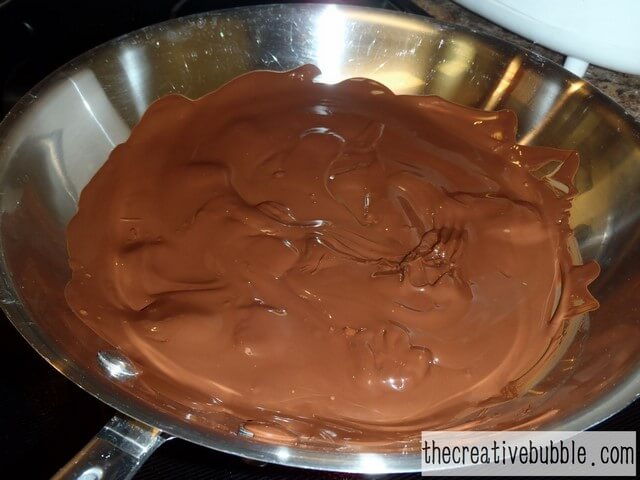
STEP 2: Melt the chocolate.
STEP 3: Add the nuts! Coat completely in chocolate.
STEP 4: Give your trusty side-kick some attention.
STEP 5: Coat nuts in cocoa.
STEP 6: Drizzle melted chocolate over nuts and mix with hands. Add more sugar/salt if desired.
STEP 7: Eat and enjoy!
Detailed Steps
(same as above, but with pictures and tips):
Here we go...
STEP 1: Prepare cocoa, sea salt, and sugar mixture.
Just mix it all up in that wide pan or bowl I mentioned earlier.
Just mix it all up in that wide pan or bowl I mentioned earlier.
Add however much sea salt and sugar you want. I start with a little, then add more as desired after adding a couple nuts and trying them out. These nuts are great even without the sugar - you can even wait and just sprinkle it on the nuts at the end for a nice finishing touch. And too much salt can ruin them, so be careful!
Optional time-saving approach: You're going to put the chocolate covered nuts into this mixture soon... if you want to take a different approach that will save you some time, you can put this mixture into a large plastic bag or container with lid, then add all of the nuts at once and shake it up. You'll end up losing some of your chocolate that way and risk having your nuts clump together.
STEP 2: Melt the chocolate.
If you don't have any fancy chocolate melting mechanisms, just do it in a pan on low-medium heat and stir frequently until melted. Once completely melted, remove from heat.
If you don't have any fancy chocolate melting mechanisms, just do it in a pan on low-medium heat and stir frequently until melted. Once completely melted, remove from heat.
STEP 3: Add the nuts!
BTW, ever heard of aflatoxins? If not, Google it... make sure your almonds don't have any obvious mold on them.
Coat the nuts completely in the chocolate.
For extra chocolaty nuts, you could coat once, let them dry (put in fridge to speed up the process), then coat again. I don't have the patience for that so I just do it once.


STEP 4: Give your trusty side-kick some attention.
Your side-kick is an important part of this recipe. You need a side-kick that is loyal and committed to sticking with you throughout this process to ensure that you focus and make the best nuts possible. A dog is best, but you could use a different pet, small child, spouse, etc...
Your side-kick is an important part of this recipe. You need a side-kick that is loyal and committed to sticking with you throughout this process to ensure that you focus and make the best nuts possible. A dog is best, but you could use a different pet, small child, spouse, etc...

STEP 5: Coat nuts in cocoa.
Ok, this is the somewhat time consuming part...
Make sure your cocoa/salt/sugar mixture is evenly dispersed in your pan. Take each chocolate covered nut and place into the mixture, oooone at a tiiiiime. I use a fork to transfer the nuts. It takes a minute, but that is the best way to ensure they don't clump together. If you come up with a more creative way that makes this process a little less time consuming and also keeps the nuts from sticking together, please share!
I put the "wet" nuts into a round baking pan, insert nuts until no room is left but to where they aren't touching each other, cover with a lid, then shake them up. Repeat process.

You can put "wet" chocolate covered nuts on top of nuts that are already coated in the cocoa mixture or replace coated nuts each time by putting them in a different pan (using a slotted spoon), then add more "wet" nuts. Here is my setup (notice the trusty side-kick):

After transferring all nuts to the cocoa mixture, save the leftover melted chocolate.
During this process, if your trusty side-kick happens to be a dog, avoid giving them any of the tasty ingredients, even if they give you this look as if they haven't eaten in months.
During this process, if your trusty side-kick happens to be a dog, avoid giving them any of the tasty ingredients, even if they give you this look as if they haven't eaten in months.

Your cocoa coated almonds should look something like this now:

Almost done...
STEP 6: Drizzle melted chocolate over nuts and mix with hands.
Take your leftover melted chocolate (you could melt more if needed) and drizzle it all over your cocoa covered nuts. I drizzle a pretty generous amount and try to get a little on each nut. Then use your hands (or a spoon if you don't want to get your hands dirty, but hands are better) and mix up the chocolate onto the nuts until coated to your desired level of chocolatyness. Try to keep your nuts from sticking together. You can add more sea salt and/or turbinado sugar at this point. I transfer them to a new bowl, then put them in the fridge for about 5 minutes so they harden. The finished product is below.
Take your leftover melted chocolate (you could melt more if needed) and drizzle it all over your cocoa covered nuts. I drizzle a pretty generous amount and try to get a little on each nut. Then use your hands (or a spoon if you don't want to get your hands dirty, but hands are better) and mix up the chocolate onto the nuts until coated to your desired level of chocolatyness. Try to keep your nuts from sticking together. You can add more sea salt and/or turbinado sugar at this point. I transfer them to a new bowl, then put them in the fridge for about 5 minutes so they harden. The finished product is below.

STEP 7: Eat and enjoy!
These have been a big hit with all of my taste testers.
TIP: Try to resist eating them all at once (seriously, they have a lot of fiber).
This is something I will definitely try! I found your website because of Todd Starnes on Facebook! Have a blessed week. Stop by my Fireplace Decorating Blog anytime!
Replyhttp://fireplacedecorating.blogspot.com/
Thank you so much for stopping by!