Tuesday, May 29, 2012

Watermelon Baby Carriage

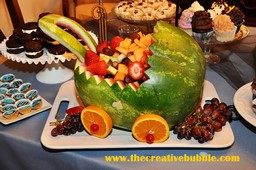
If you are hosting a shower or doing your own, this is such a cute variation to a fruit tray.  It was definitely a big hit at my baby shower.  It's pretty easy to make using the directions below.

Drop me a comment to let me know how yours turned out or if you used a different variation.


You will need:
an oval shaped watermelon
a knife
melon baller or ice cream scoop
toothpicks
assorted fruit

-Use a knife to cut a thin segment from the bottom of a medium-sized watermelon. The bottom of the watermelon is one of the long sides. Choose the side that is least attractive for the bottom. Discard the cut-off piece. This will give the watermelon a flat surface to set on and keep it stable while you work.

-Place your watermelon on your work surface so that the cut side is down. Using your knife, make a vertical cut one-third of the way from one end of the watermelon, cutting until you are about halfway through the melon. Then use your knife to make a horizontal cut from the opposite side of the melon. Start the cut halfway down the melon. Cut horizontally until you reach the spot where your vertical cut ended. This will make a wedge of melon that you can remove and set aside. The vertical cut is the hood of the carriage and the horizontal cut is the body of the carriage.

-Use a melon baller or ice cream scoop to clean out the inside of the watermelon as well as the removed section of fruit. Scrape away all of the fruit down to the white flesh of the melon. Reserve the fruit to make a fruit salad.

-Use your knife to add a zigzag pattern to the hood of the carriage. Cut triangles around the edge of the hood and discard the cut-off rind pieces.

-Use your knife to cut the removed section of fruit into a rectangular shape. Cut out the center of the rectangle so that you have a rectangle with a rectangular hole in it. This will be the handle of your baby carriage.

-Attach your carriage handle to the inside of the watermelon, opposite the hood. Use toothpicks to skewer the handle into the side of the carriage.


-Use rounds of fruit to create the wheels of the carriage. You can use grapefruit, orange, lemon or lime slices. You can also use round pineapple slices if you prefer. Place the round fruit of your choosing on the side of the carriage where the wheels would be. Use a toothpick to skewer them in place. Leave 1/4 inch of the toothpick exposed. Cap the toothpick using half of a maraschino cherry or a grape.

-Make a fruit salad, and use it to fill the body of your carriage. To make a fruit salad, clean and cut up strawberries. Mix the strawberries with the reserved watermelon, balls of cantaloupe, slices of pineapple and grapes. Place the mixed fruits in the carriage.

I found these instructions on ehow.com.  My uncle made this one for my shower, and I can't wait to make one for a friend! 


Thanks for visiting thecreativebubble.com.  Check out some other fun party and craft ideas here.

Sunday, May 27, 2012

Citrus Brown Sugar Scrub


This scrub was part of a bath gift basket I made for family members for Christmas.  It has gotten good feedback so far!  It really softens your skin and smells incredible.

For gift ideas, take a look at the other items that went into these  Gift Baskets :

Peppermint Bath Fizzies
Tired Muscle Salt Soak
Lavender Bath Salts
Orange Almond Bath Fizzies
Shea Butter Chai Tea Exfoliant Bar
Refreshing Shea Butter Soap

Citrus Brown Sugar Scrub

Ingredients:
2 Cups Organic Brown Sugar
½ Cup doTERRA Fractionated Coconut Oil (you can use a light olive, grapeseed, almond, or sunflower oil)
¼ Cup Honey
5-10 Drops Wild Orange Essential Oil (You can also use "Citrus Bliss", a doTERRA blend.)
5-10 Drops Bergamot Essential Oil 
5-10 Drops Almond Oil
10 Drops Vitamin E Oil (or break open a Vitamin E Capsule)

Directions:
Place the brown sugar in a medium bowl.  Mix in the oil, then stir.  Then, mix the honey and stir.  Add the essential oils slowly until you reach a scent that you like.  Add the vitamin E oil.  I dropped a cinnamon stick in to make it look pretty.  That’s it!  Stir well before use. 

How to order essential oils:
If you are looking for essential oils, I recommend using doTERRA's certified, pure therapeutic grade oils.  You can find them at  my doTERRA store .  If you'd like to receive wholesale prices, 25% off retail, please comment below or email me, and I can help you sign up.


You can find containers for bath products at thrift stores, craft stores, or the regular grocery store (mason jars work).  

Saturday, May 26, 2012

Hammock Day

staring at Lago de Atitlan in 2007

 I went to Guatemala in 2007 with friends and went back again in 2008 with a friend and my boyfriend (now husband).  Michael proposed there on my birthday at a beautiful place called Casa del Mundo.


standing in front of Lago de Atitlan

I discovered that you do lots of laying around in hammocks when you go to Guatemala for vacation.  (Also, when you go there on vacation, you probably feel as bad as I did when I had to say "no" to all the people who asked if I was there for a mission trip!)   Then, you go home and crave a part of the experience you had.  The second time we went, I spent a good bit of time walking around clusters of little shops, hoping to find a good hammock to take home. By good, I mean inexpensive (and most everything is!).  We only spent about $8-$10 per night at most places we stayed. 

 at the "Jungle Party" hostel in 2008

They had the best chocolate milk shake I've ever had.  Michael is fake drinking this...he and chocolate aren't really friends in real life.


 They also had the best guacamole, crepes (lemon and powdered sugar), and hummus I've every tasted.  I know...crazy, right?

 
We rode on a small boat with a guy who was lugging around four giant bags of avocados to ship to the US.  Must be nice to get them for free!

 crawling into Mayan ruins...I think I almost got in trouble by the temple guards

I had to do some reminiscing. Anyway, I did find a hammock.  It had been hanging out in a cedar chest for four years until today.  FINALLY, I have space for it at our new house.  Yes everyone, it was an exciting day here. 


I don't do much traveling anymore, so this is going to be a great getaway in our backyard.  Pulling it out of the chest reminded me of how much things have changed.  I never imagined that the first time I sat in it, I'd have a sweet baby boy with me.  Levi loved it!


Michael and I always say that maybe "someday" we will go back to the place where we got engaged.


 the plane ride home...adios Guatemala!

Thursday, May 24, 2012

Almond Butter Cookie Pops


My second job was at a Godiva chocolate shop. There was this amazing almond butter truffle that my sister and I (she worked with me, which made it the best job ever!) would snag almost every shift (the manager said we could "pig out" while we were working). This recipe is my closest representation of that, in combination with a cookie, all dipped in chocolate....oh, and on a stick.

You can replace the almond butter with cashew or peanut butter. The chocolate can be dark, milk, or white, but I like milk chocolate for this recipe. 

Makes approximately 36 cookie pops

Cookie Filling:
  1. Preheat oven to 350. Lightly grease mini muffin pan.
  2. Cream the butter and sucanat together until smooth.
  3. Beat in the egg, then stir in the vanilla.
  4. Dissolve the baking soda in hot water, then add to the batter along with the salt. Stir in the flour.
  5. Fill mini muffin pan about 3/4 full in each hole.
  6. Bake about 8-12 minutes until lightly browned.
  7. Let cool slightly, then firmly place sticks in the middle of each cookie while still in pan.
  8. Gently remove cookies and set aside on wax paper. 
Almond Butter Filling:
  • 3/4 cups Butter
  • 1 1/4 cup Organic Graham Cracker Crumbs
  • 1 1/4 cup Almond Butter
  • 1 1/2 cup Unrefined, Homemade Powdered Sugar
  • 24 ounces Chocolate Chips
  • 1/2 cup Diced Almonds
  1. Melt butter slightly. Mix first four ingredients together. Some almond butters are drier than others. If mixture is not moist, add more butter slowly until it reaches a moldable, yet moist consistency.
  2. Roll almond butter into small disks, then put sticks through disks down onto cookies. You will need to lightly smash the butter into the cooled cookie.
  3. Place pops into freezer for 15 minutes.
  4. Melt chocolate chips. Remove pops from freezer and dip into chocolate.
  5. Let chocolate set a little then pat almonds around the sides of pops. Set on wax paper in fridge to fully set until ready to serve. 

Tuesday, May 22, 2012

Tired Muscle Salt Soak


Tired Muscle Salt Soak

Ingredients:
1 Cup Epsom Salt
½ Cup Sea Salt
3-5 Drops of Malaleuca Essential Oil
3-5 Drops of Peppermint Essential Oil
3-5 Drops of Cedarwood Essential Oil
3-5 Drops of Eucalyptus Essential Oil
1-2 Drops Yellow Liquid Soap Dye (optional-found at craft stores)

Pour Salt into a medium mixing bowl.  Slowly drop essentials oils in one drop at a time.  Add one drop of yellow dye, stirring salt quickly (it may adhere to some pieces of salt more than others…you can fish those out).  I was going for a very light yellow color.  Add another drop or two until you reach the color you like.  Pour into containers. 

How to order essential oils:
If you are looking for essential oils, I recommend using doTERRA's certified, pure therapeutic grade oils.  You can find them at  my doTERRA store .  If you'd like to receive wholesale prices, 25% off retail, please comment below or email me, and I can help you sign up.

You can find containers for bath products at thrift stores, craft stores, or the grocery store (mason jars work).  I found these bags at Hobby Lobby and used a 40% off coupon I found online.

Sunday, May 20, 2012

Lavender Bath Salts


These bath salts were part of a bath  gift basket I made for family members for Christmas.  It's great to use before bed, because the lavender is very relaxing.
Lavender Bath Salts

This recipe will give you a good excuse to go buy some roses !  My husband bought me some for this and I got to enjoy the extras :)

Ingredients:
1 Cup Epsom Salt
½ Cup Sea Salt
10 Drops doTERRA Lavender Essential Oil
1-2 Drops Red Liquid Soap Dye (optional-found at craft stores)
2 Rose Petals (I used fresh red roses, but dry will work well.)

Directions:
Put Salt into a medium mixing bowl.  Slowly drop lavender oil in one drop at a time.  Add one drop of red dye, stirring salt quickly (it may adhere to some pieces of salt more than others…you can fish those out).  I was going for a very light pink color.  Add another drop or maybe two until you reach the color you like.  Break rose petals into small pieces and add them to the salt mixture. 

How to order essential oils:
If you are looking for essential oils, I recommend using doTERRA's certified, pure therapeutic grade oils.  You can find them at my doTERRA store.  If you'd like to receive wholesale prices, 25% off retail, please comment below or email me, and I can help you sign up.


For Christmas gift ideas , take a look at the other items that went into these Gift Baskets:

Tired Muscle Salt Soak
Citrus Brown Sugar Scrub
Orange Almond Bath Fizzies
Peppermint Bath Fizzies
Shea Butter Chai Tea Exfoliant Bars
Refreshing Shea Butter Soap


You can find containers for bath products at thrift stores, craft stores, or the grocery store (mason jars work...baby food jars do too!). I found these jars at Hobby Lobby and used a 40% off coupon I found online.  Don't forget that Jo-anne's will accept Hobby Lobby coupons, too.
Tip Junkie

Bath Gift Baskets


For Christmas presents this past year I decided to make bath goody gift baskets for friends and family. 

  Each basket included:


Some of these items varied in difficulty and price, but they were all pretty easy for the most part.  The hardest part was finding the time to make so many different items.  I must have been imagining I was a childless woman when I went out and bought the supplies for all of this!  

My baby boy got a lot of “daddy time” before these baskets were finally completed, and our kitchen looked like a bomb had exploded pastel bath fizzies everywhere.  Don’t let this deter you though.  I had fun destroying my kitchen, and it was well worth the risk when I watched everyone open their baskets.  I know it made them feel special that I took the time to put these together for them.  


The baskets were from the dollar store (They have tons to choose from!).  I just used tissue paper inside, then wrapped them in cellophane with a raffia bow.  I found the labels at Kroger. 

Most of the jars and bags were from Hobby Lobby. 


I recommend using doTERRA essential oils to add natural fragrance to the gift basket items.  You can find my doTERRA store here.  Please let me know if you have any questions about any of the products or about how I used them in these gift baskets.  I might even add some bottles of essential oils to these baskets if I were to do it again.  I think the "Serenity" blend, "Balance" blend, and "Frankincense" would be lovely additions.  


Thursday, May 17, 2012

Welcome to Our 60's Charmer

I would like to preface this entry by stating that Michael and I are very excited to have our first house...despite the updates it may need!


The previous owners' daughter gave us this photo taken around 1957.  She was raised here since she was born, and it was a one owner house.


The closing was a very emotional day for her.  It meant a lot to me that she went out to her car to get this little photo her dad took when it was built.  She was very proud.  I would love to go back and visit my childhood home.  This will be Levi's childhood home <3


Come on in!!


Yes, there is glitter up there.


I LOVE the kitchen for how many cupboards it has.  It needs a little love.


For example, see below.  This wallpaper was probably beautiful back then, but I think it's time for some paint and a new light switch cover.  It is pretty though....the cover, I mean...kind of.


The panel wall needs some help, too.  Paint is all we can afford for now.  So paint will do.


My handsome family :)


...view from the sunroom.  A sunroom will be fun!  The curtains aren't so fun.


Bye bye awnings.
Hopefully these come off easily without leaving marks on the siding.


The garage and I will get along just fine.  I can't wait to finally have a place to put our gardening supplies and maybe to even have a craft area.


I love this little porch.


This bathroom could use some updating.


There is different paper in most of the kitchen cabinets.  The owner left all these helpful cooking papers taped inside this cupboard.  So neat...


 Levi and I...  He just wanted to get down and explore...and eat twigs and grass.


A close-up of our old new house.  :)  Thank you Lord for our home.


Tuesday, May 15, 2012

Homemade Caesar Salad Dressing and Croutons


I wanted to cook a nice dinner for my husband tonight. He loves steak and Caesar salad so I figured that would be a good choice. We went to the Bahamas last October and had a table-side Caesar salad at one of the restaurants in our hotel. It was by far, the greatest Caesar salad I have ever eaten! It was so fresh - they hand mixed all of the ingredients in a large wooden bowl, including the anchovies and raw egg. I doubted that I could ever create anything even close to comparable to that salad, but decided to give it a go…

Being a bit of a pansy, I wanted to avoid using a raw egg in my recipe. I ended up using this recipe on yummly.com with a couple changes:
1/2 cup olive oil (divided)
3 garlic cloves (crushed divided)
1/2 tsp kosher salt (coarse)
White bread (crust removed cut into cubes)
1/3 cup freshly grated parmesan (cheese)
1/4 cup mayonnaise
2 anchovy fillets
1 1/2 tbsps balsamic vinegar
1 1/2 tbsps fresh lemon juice
1/2 tbsp dijon mustard
1/2 tsp worcestershire sauce
1 romaine lettuce (large head, torn into bite size pieces)
*see site for directions
I subbed the following in the dressing recipe:
·         Instead of the mayonnaise, I used Lemonaise which is great on sandwiches too! Much better for you than regular mayonnaise since it doesn’t have soybean oil and is lower in fat.
·         I subbed the Dijon mustard with something we had handy in the fridge, a low-fat Dijon salad dressing.
·         Instead of romaine, I used a salad mix I got at the farmers market today from Beaverdam Creek Farm.
I also made the croutons (used sourdough instead of white bread). For both recipes, I used olive oil from Whole Foods from the big vats of oil that you dispense yourself. A little expensive, but was good for the dressing.
Croutons
I started with the sourdough bread. 

I removed the outside crust from the bread. This pulled off very easily. I cut the soft white inside part of the bread into small rectangular shapes.


Next, I chopped up fresh garlic. 

 Then I mixed in salt & pepper and olive oil with the fresh garlic.


I coated the bread with the olive oil mixture, then placed it on a baking sheet.


It baked for about 15 minutes – I taste tested the croutons along the way to see when they were done. They came out with a nice toasty/crispy texture. 

Next came the Caesar dressing. I mixed all of the ingredients into a food processor, including two of these guys:


And some of this… plus everything else in the ingredient list… 

I blended the dressing for about a minute in the food processor. It was a lot easier than I thought it would be.

The croutons cooled off while I waited for my husband to get home. Once he got home, I reheated the croutons for a bit before putting them on the salad.


I mixed the dressing with the lettuce, put the warm croutons on, then topped off with some shaved parmesan cheese, and viola!